
Introduction
I’ll start strong and say that ActiveStorage has got to be one the most useful tools that comes bundled with Rails. Once you pay the initial cost of learning how it works, it's baffling how easy it is to upload and download files, both on local and production environments.
Why are we here, then? If it really is so easy, then why am I writing this? Well, the cold hard truth is that there is no such thing as a free lunch, and generic out-of-the-box solutions are hardly ever optimal for every use case. Today we’ll look into a fairly common problem for Rails devs working on a project that depends on media like images or videos: ensuring a good download experience for all users. We’ll create a solution using a Rails API (with ActiveStorage) and two AWS services: S3 and Cloudfront.
Here are the tools and libraries we’ll use:
rails7.0.2.3aws-sdk-s31.153- An S3 bucket
- A Cloudfront distribution
ℹ️ This blogpost is both beginner-friendly and senior-friendly. Want me to stop yapping and just get to the point? Jump to the TL;DR section. Or keep reading, I’m not your dad.
The Problem
Say you want to implement an Instagram competitor (just don’t, but for the sake of the post let’s run with it). The first problem you need to think about is how to deliver content to all your users. Videos and images can be uploaded and streamed from anywhere. If you are serving your files from the US, then your users in Europe or Asia might experience degraded performance constantly caused by the comparatively long time it takes information to reach them. Scratch that, even your US users might experience horrible performance and you won’t even know it. Being physically closer to a server does not guarantee good latency. Your eager user might turn into a detractor by merely walking a couple of miles and connecting to a different access point (this actually happened to us).
Content distribution is a complex problem to solve by yourself. It’s hard to test and it’s hard to reproduce issues. Setting up the infrastructure to deliver big files to all users while ensuring a certain download speed threshold is almost impossible. That’s why CDNs exist.
What are CDNs and How Do They Work?
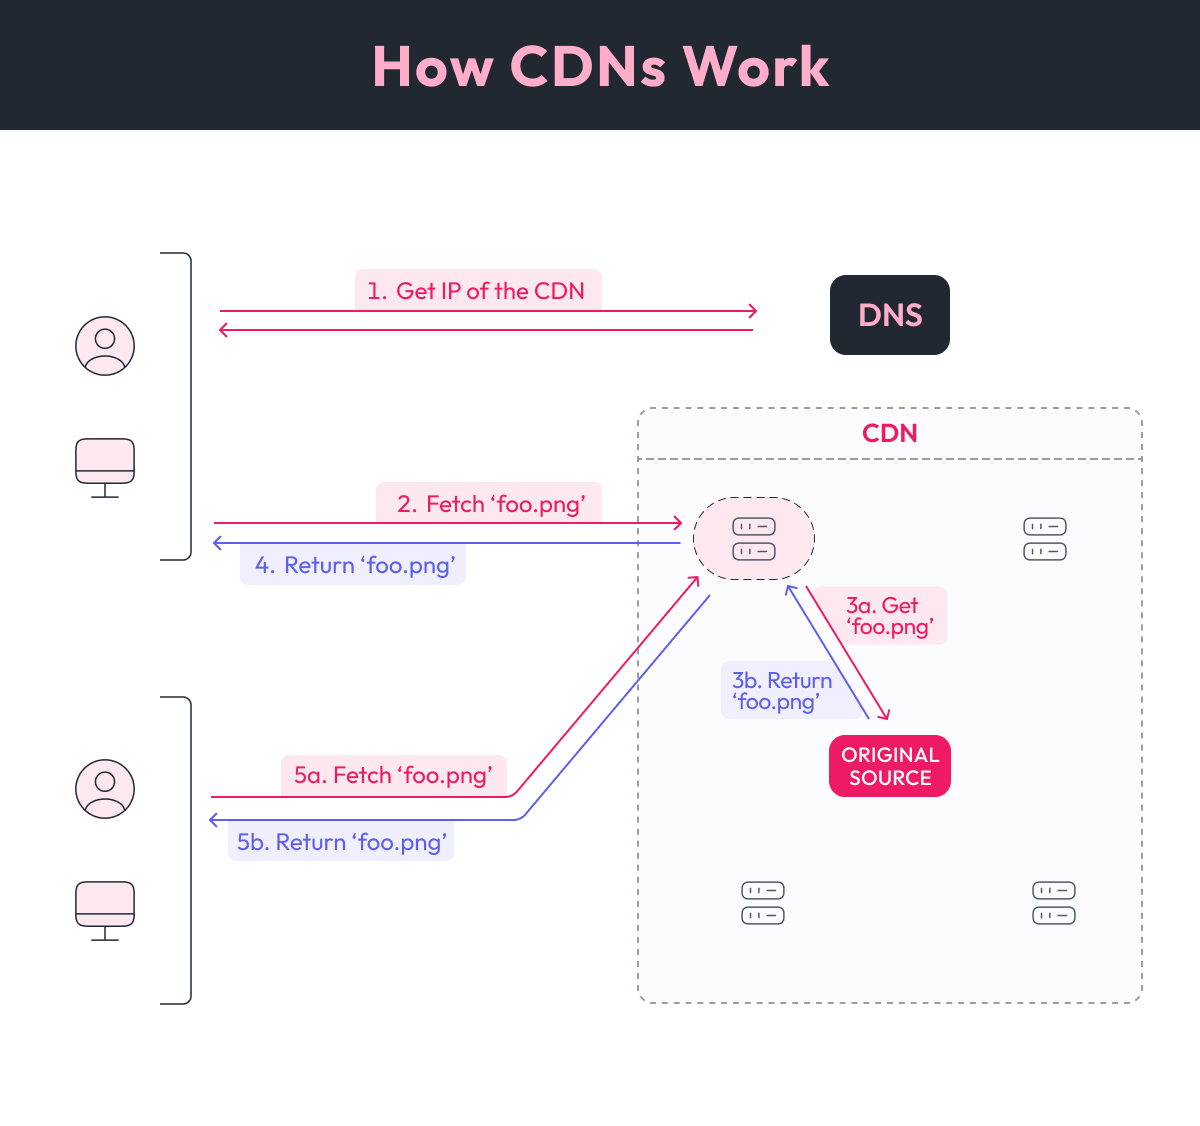
Content Delivery Networks act as caches of data. They store copies of content on multiple nodes around the Internet and intelligently choose where they serve it from, hopefully bridging the gap between your files and your users. Here’s a simple diagram to help you understand how they work.
-
Your user intends to access a file. Note that, in this case, the URL points to the CDN and not to your server. First, it needs to resolve the IP of the CDN’s node.
- a. CDNs intelligently “trick” your user into sending the request to the closest node in the network. This can be done by using smart DNS servers that look at your users' IP and estimate a good node, or even by manipulating how networks of nodes collectively build routing information (out of scope, go read something made by people smarter than me).
-
After getting the IP of the host of the file, the user attempts to fetch the file. Their request gets handled by a node from the CDN.
-
If this is the first time this node has been asked for this file, then it’s a cache miss. The node needs to fetch it from source. In this case, the node queries your server (or whatever location acts as an authority). The CDN node stores the file locally for future access. In this diagram the authority is inside the CDN for convenience, but it could be outside.
-
The CDN node returns the file to the user.
-
Another user asks for the file? No problem! As long as the CDN node considers the file not to be stale it will avoid going back to the source and just return the cached file.
Now that we know what a CDN is, let’s talk about what we’ll do in this blog post.
Overview of the Cloudfront and Activestorage Integration
We want our users to have the best experience possible from anywhere, but we also want to ensure our content is still moderated by us and that we decide when users should have access to it or not. That’s where Cloudfront comes in, as it lets us lock content behind signed URLs (more on this later).
Here’s what’s on our plate today:
- Create and configure an S3 bucket to use with ActiveStorage.
- Create and configure a Cloudfront distribution.
- Final touches over our API to close the loop.
To get us going, here’s how a user will access our content:
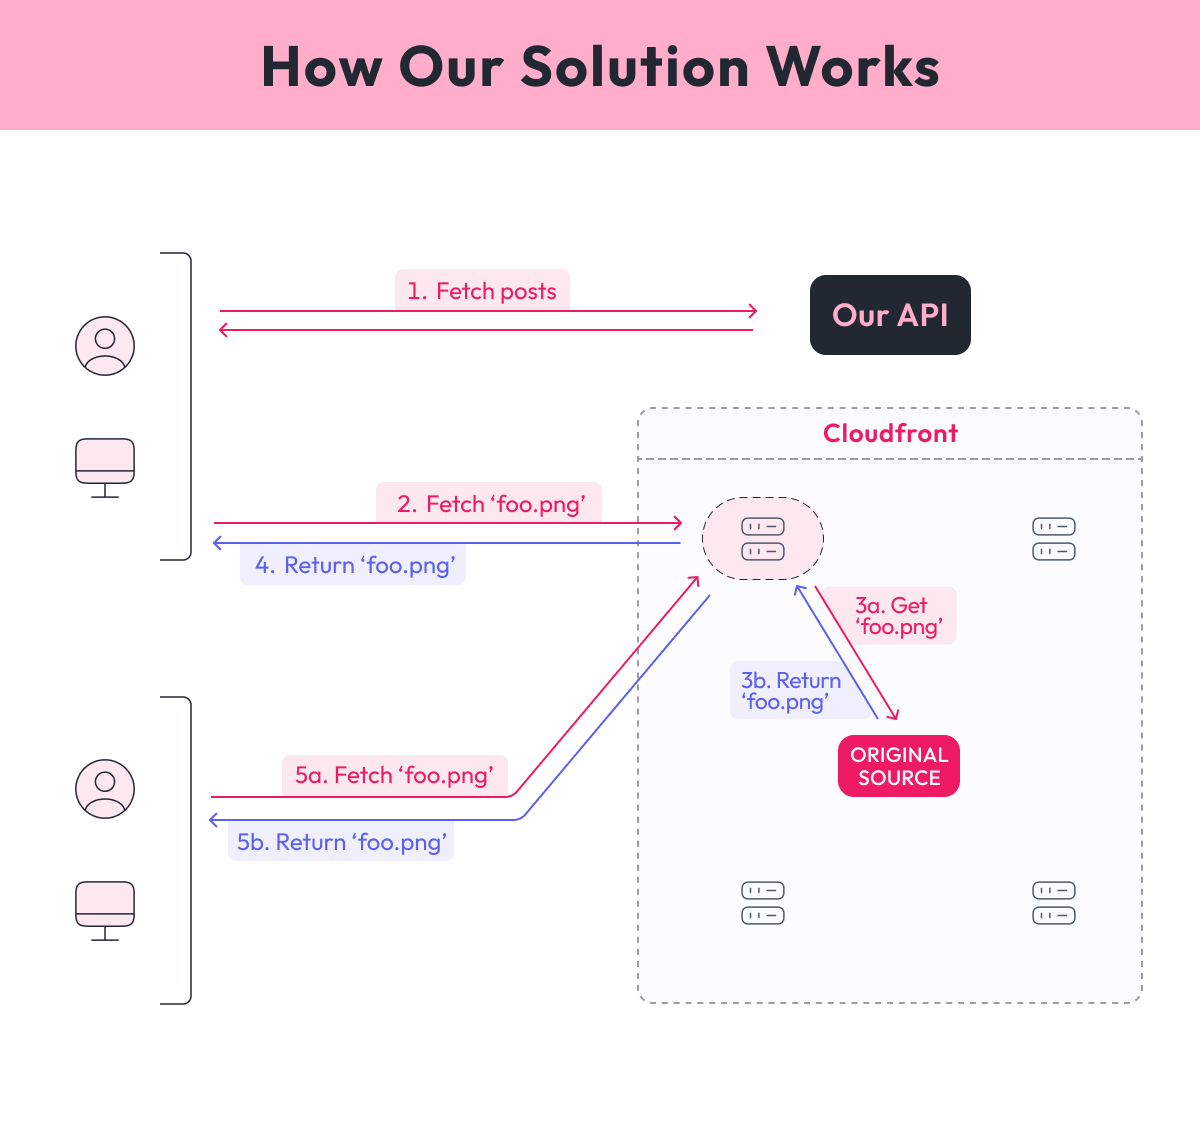
- The user requests information from our backend. Think, for instance, an Instagram post or a list of posts. Some of that information will be links to media or content, which will not point to Cloudfront, but rather our API.
- The browser tries to render our files, so a request is made to our API. Authentication and authorization checks can be performed by our backend, and if the user is allowed, they will be redirected to a specially crafted Cloudfront URL. We’ll talk about these later.
- Cloudfront receives the request, checks the signature on the URL. If valid, then it will return the content (if cached) or forward the request to S3.
- S3 checks whether the file exists and returns it to the Cloudfront node.
- Cloudfront caches the file locally (it actually caches the whole response from S3, but that’s not important right now). It then returns the file to the user.
Let’s start setting this up.
Setting up S3
Creating the S3 Bucket
Our S3 bucket will be in charge of storing all our content. Contrary to instinct, we want our bucket to be completely private and only accessible via authenticated requests. Why? Well, it’s our API’s job to let users in or not. If your bucket is public then all links to its content are public permalinks and, barring renaming the file or deleting it, you cannot stop a user from accessing the content forever. By making the bucket private, we force users to go through our API first.
Let’s start by creating our bucket. First, name it. A bucket’s name needs to be URL-safe as well as unique worldwide. That’s because the name of the bucket is part of the domain name that AWS assigns to it.
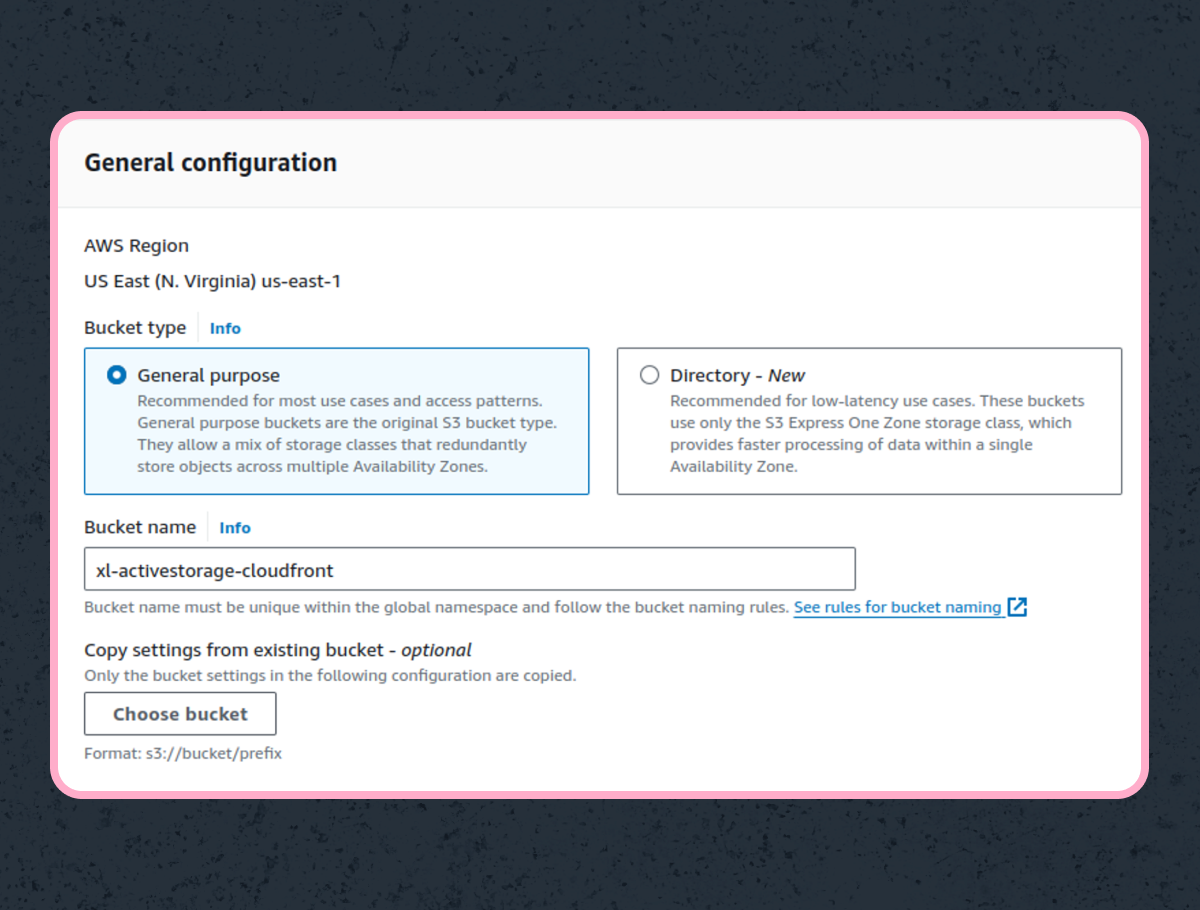
Notice how, by default, the bucket is completely private. We want this. Here’s how it should look:

I won’t post all other settings and options here for the sake of length, but make sure to review them. You’ll also need to configure CORS headers for your domain if you have not done so yet. Once you create the bucket you’re halfway there. Now we need to create a specific user with specific permissions.
Creating the User
It’s always best practice to create a specific user that manages S3 buckets. I even go as far as to say that you should create one specific user for each environment that only has access to one bucket. By setting a very specific policy you can make sure that if your AWS credentials for that user leak the impact is as minimal as possible. Here’s an example of a policy you can use for that user:
{
    "Version": "2012-10-17",
    "Statement": [
        {
            "Action": [
                "s3:PutObject",
                "s3:PutObjectAcl",
                "s3:GetObject",
                "s3:GetObjectAcl",
                "s3:DeleteObject",
                "s3:ListBucket"
            ],
            "Effect": "Allow",
            "Resource": [
                "arn:aws:s3:::xl-activestorage-cloudfront",
                "arn:aws:s3:::xl-activestorage-cloudfront/*"
            ]
        }
    ]
}
Remember to store your AWS access key and secret key in a safe place. You’ll need them to allow ActiveStorage to upload files to the bucket.
Now that our bucket is up and running, let’s set up our Cloudfront distribution.
Setting up Cloudfront
Here comes the fun part. Let’s create a Cloudfront distribution linked to our S3 bucket. Step 1: set the origin to the one that points to the bucket you created previously.
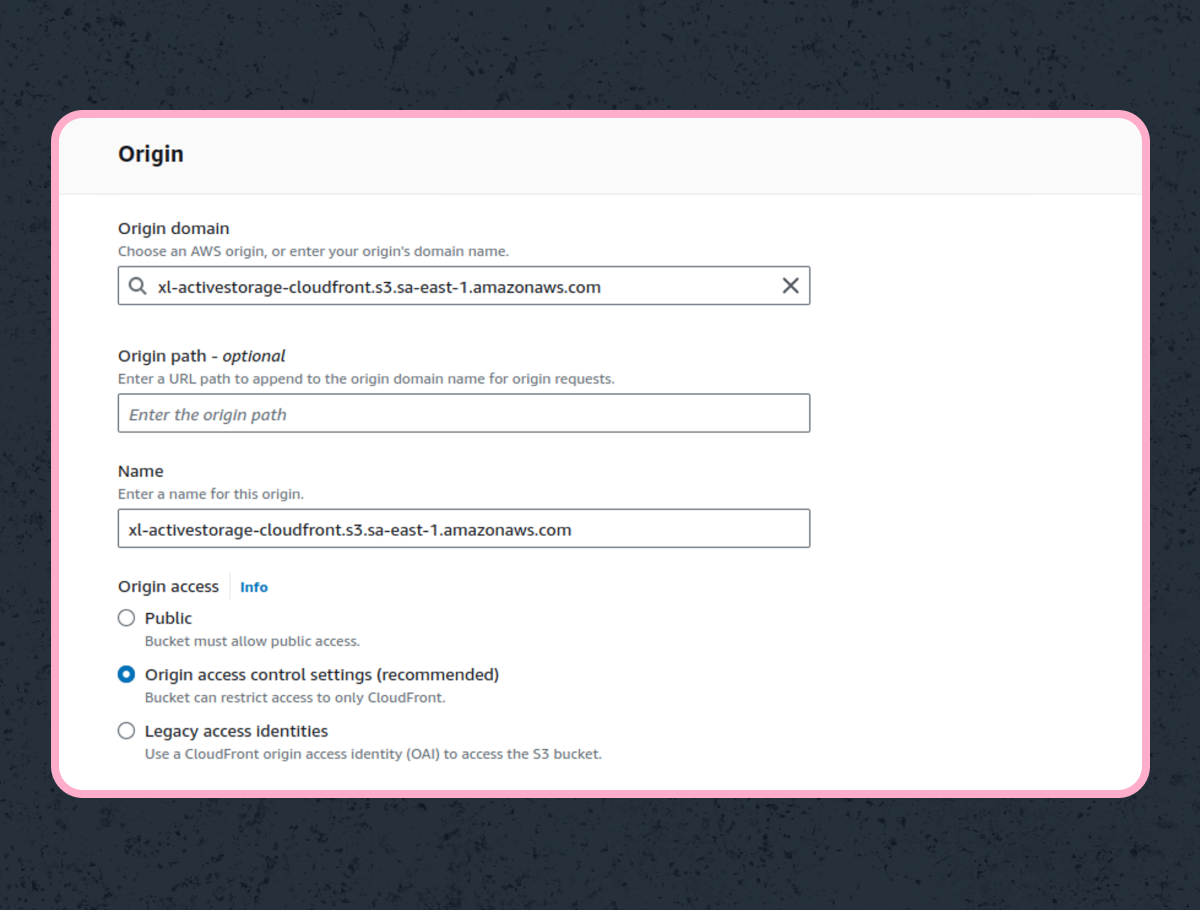
By selecting “Origin access control settings” you’ll need to create an Origin Access Control. Make it so requests are signed.
As with the S3 bucket we’ll be skipping options that are not that relevant.
Step 2: I recommend setting the distribution to only accept HTTPS connections. What you will need one hundred percent is restricting viewer access. This tells Cloudfront to only accept connections from a signed URL or signed cookies. We’ll use signed URLs. You will need to create a trusted key group, which can include a few trusted public keys. For now you can just create a group with one key. Note that you’ll have to create the key pairs locally and upload only the public key to AWS. You can find more information here. Keep the private key handy, you’ll use to sign requests.

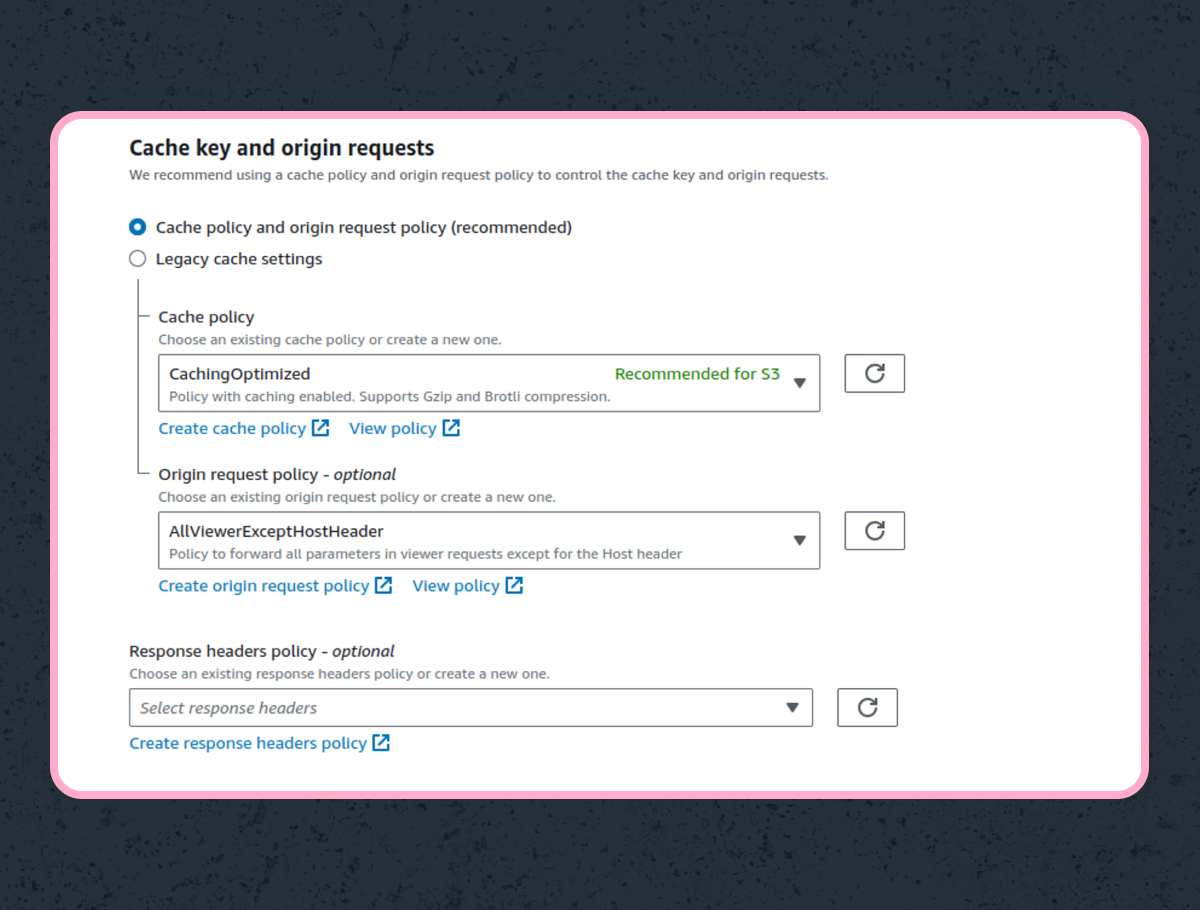
Next, configure the distribution to forward query parameters to S3 so that you don’t lose access to features like setting the content disposition. Here I’ve done it so Cloudfront forwards everything to S3, which might not be desirable.
Now that our bucket and Cloudfront distribution are online, let’s configure ActiveStorage! But first, notice that once you create a distribution AWS automatically assigns a domain to it, keep it handy.
ActiveStorage Configuration
This section assumes you already have a basic ActiveStorage configuration up and running. Let’s first dig into some ActiveStorage aspects.
Redirect Mode Vs Proxy Mode
By default, ActiveStorage is configured to use the so-called “redirect mode”. This means that when a user requests an image ActiveStorage will redirect them to the actual source, in this case S3, and the user can directly request the file. Proxy mode, on the other hand, hides the source of the assets, and your API becomes a reverse proxy to it. Each time a user requests a file, your API will download the file from the source and stream it back to the user. Both approaches have their pros and cons, which I will not go into now.
In this case, we’ll use redirect mode. Those of you who are avid readers of Rails documentation might say “ActiveStorage actually says proxy mode can be used with CDNs”. Well… you are kind of right, but it depends on how you want to structure everything. The documentation assumes your CDN will re-route requests to your API, which is not the case here, since we want to limit user access. Also, if we were to do it as the documentation suggests we would not be able to leverage Cloudfront’s direct connection to S3.
Signed URLs
Ok, time to have a chat about signed URLs. The first thing of note is that signed URLs are just normal URLs, except that they carry a signature (typically in base 64 since it’s URL-safe). The recipient of the request (be it S3, Cloudfront, or whatever service) can then verify that the signature is valid to be confident it was generated by an authorized party. Signatures provide a way for our API to let users hit Cloudfront directly, but only with our explicit permission. It’s the best of both worlds! Our API does not need to pay the cost of data transfer, but it can still limit access to the data. We’ll look at examples in a moment.
One thing to disambiguate right now is that S3 supports signed URLs, but so does Cloudfront. Both kinds of URLs follow the same logic, but are completely different, not just in format but also in how they are signed in practice. A corollary of this is that S3 signed URLs won’t work with Cloudfront and viceversa. Why is this important? Well, ActiveStorage is prepared to generate S3 signed URLs out of the box (and it’s actually what it does by default if your bucket is private). By introducing Cloudfront we need to change what ActiveStorage is doing when serving URLs to our files.
Let’s look at examples of signed URLs. Note that these are just here for illustrative purposes and don’t actually point to anything. Here’s a signed URL for our S3 bucket created previously:
https://xl-activestorage-cloudfront.s3.amazonaws.com/ uivi1ye50kmapzmn5rr3h8wy2wye?response-content- disposition=inline%3B%20filename%3D%22Group%20168.png%22% 3B%20filename%2A%3DUTF-8%27%27Group%2520168.png&response- content-type=image%2Fpng&X-Amz-Algorithm=AWS4-HMAC-SHA256&X- Amz-Credential=AKIAWJA6LBQMVE3WMN75%2F20240709%2Fus-east- 1%2Fs3%2Faws4_request&X-Amz-Date=20240709T201035Z&X-Amz- Expires=172800&X-Amz-SignedHeaders=host&X-Amz-Signature= 8e8ef2e42ae70ae46a030b0a8072407f4eec9abcc307945bb93354aece07dbdc
This URL was generated using ActiveStorage without configuring Cloudfront. Let’s analyze it.
-
The domain:
xl-activestorage-cloudfront.s3.amazonaws.com. It points to the bucket we created before. -
The path
uivi1ye50kmapzmn5rr3h8wy2wyeis the ActiveStorage blob key, which coincidentally matches the path to the file on the bucket. This is how ActiveStorage saves files by design. -
The query parameters:
response-content-dispositiontells S3 what to send on theContent-Dispositionheader if the request is successful. This is useful for instructing the browsers to display content inline or trigger a download.response-content-typeis similar to the previous one, but it tells S3 what to send back on theContent-Typeheader.X-Amz-Algorithminforms S3 on what algorithm was used to generate the signature.X-Amz-Credentialidentifies the access key that generated the signature, with some other information like the region and the date the URL was generated.X-Amz-Datecontains the exact timestamp of the generation of the URL.X-Amz-Expiresinforms S3 on the validity range of the URL, i.e. it can be used up to this many seconds afterX-Amz-Date.X-Amz-SignedHeadersinforms what headers have been included in the signature.X-Amz-Signaturethe actual signature. Notice how it is encoded in base 64.
Now let’s look at a signed URL generated for Cloudfront for the same ActiveStorage blob.
https://d221pc53be89z4.cloudfront.net/uivi1ye50kmapzmn5rr3h8wy2wye? &Expires=1720729446&response-content-disposition=inline%3B%20filename %3D%22Group%20168.png%22%3B%20filename%2A%3DUTF-8%27%27Group%2520168 .png&response-content-type=image%2Fpng&Signature=byNci40HdAjYeicFVpR 7XXK4d6aO6d5KveKEgJYWOfcORrG8~9ugES6v9Zi9jh6b2q1OmLRG5xpA1ac3cSP~gDic5aTd SecFUjJt0XkEg8E65rA1nuOPca6~JlvFiSPxyYBPiT1N7tuaRzjhuNeeSYwzJcYRLJ~9S5tb MXGLnaaZSOYUABbaDa7kcNKcmrn8GpsAJfbEvfAZmw8fhptln ~DPKlVVSdOqLuwQDqdQp6ZbO ToGwvx66gpSQHMSfkqnhmFrmNgMLXO2Io3RCplfJ9A~rnX~~PQnGidtpU6mAgRtW9C8OWPqEU6q 2HD~5DU3anqw4qzO8- pTI0VtDVdoDw__&Key-Pair-Id=K22BGJMS612N2Z
The domain d2s1pcb3be89z4.cloudfront.net points to our Cloudfront distribution.
-
The path
uivi1ye50kmapzmn5rr3h8wy2wyeremains the same. Cloudfront just forwards the path and query parameters to S3, so this makes perfect sense. -
Let’s look at the query parameters:
Expiresis the UTC timestamp that marks the moment when this URL expires.Signaturecontains the signature, which you might notice is far longer than the previous one.Key-Pair-Idinforms Cloudfront on what is the ID of the public key used to sign. Since you can use multiple different private keys to generate valid signed URLs you need to let Cloudfront know which key pair you used.- Notice how both response headers are also present, since we want Cloudfront to forward them to S3.
Mixing All Together
Now that we know we’re using signed URLs with redirect mode, how does it all look together? Well, ActiveStorage in redirect mode emits URLs that point to your API and then redirect to S3. We need that process to return signed Cloudfront URLs. In order to do that we need to overload ActiveStorage’s controllers.
But first, let’s learn how to create a Cloudfront signed URL. Luckily for us, AWS provides the aws-sdk-cloudfront gem which exposes a method to sign URLs. In order to use this we’ll create a concern named Cloudfrontable to handle this:
# app/controllers/concerns/cloudfrontable.rb
# frozen_string_literal: true

module Cloudfrontable
  extend ActiveSupport::Concern

  # Returns the Cloudfront URL for the given blob.
  def cloudfront_url(blob, options = {})
    uri = URI.parse("https://#{Rails.application.config.aws_cloudfront_domain}/#{blob.key}")
    query = [
      "response-content-type=#{URI.encode_www_form_component content_type(blob)}",
      "response-content-disposition=#{URI.encode_www_form_component(options[:disposition] || default_content_disposition(blob))}",
    ].compact.join('&')
    uri.query = query

    signer = Aws::CloudFront::UrlSigner.new(
      key_pair_id: Rails.application.config.aws_cloudfront_key_pair_id,
      private_key_path: Rails.application.config.aws_cloudfront_private_key_path,
    )

    signer.signed_url(
      uri.to_s,
      expires: Time.now.utc.to_i + ActiveStorage.service_urls_expire_in.to_i,
    )
  end

  private

  def default_content_disposition(blob)
    "inline; filename=\"#{filename(blob)}\"; filename*=UTF-8''#{filename(blob)}"
  end

  def amazon?
    Rails.application.config.active_storage.service == :amazon
  end

	# These two methods are needed in case you use variants. You'll need to make some changes
	# if you don't use variants with records.
  def content_type(blob)
    blob.is_a?(ActiveStorage::VariantWithRecord) ? blob.image.content_type : blob.content_type
  end

  def filename(blob)
    blob.is_a?(ActiveStorage::VariantWithRecord) ? blob.image.filename : blob.filename
  end
end
There’s a few things going on here:
- First we generate a URL using the Cloudfront domain and the blob key. This matches how ActiveStorage generates its URLs.
- Then we set the
response-content-typeandresponse-content-dispositionquery parameters just like ActiveStorage generates them. - The URL is signed using the key pair ID and the private key from that key pair. Make sure you define the path to the private key correctly.
Now let’s use this concern. We need to overload two controllers: ActiveStorage::Blobs::RedirectController and ActiveStorage::Representations::RedirectController. You can find the original implementation of these controllers here and here. In order to overload the controllers, you need to create two controller files in a specific location. Let’s look at the blob redirect controller:
# app/controllers/active_storage/blobs/redirect_controller.rb
# frozen_string_literal: true

class ActiveStorage::Blobs::RedirectController < ActiveStorage::BaseController
  include ActiveStorage::SetBlob
  include Cloudfrontable

  def show
    expires_in ActiveStorage.service_urls_expire_in
    redirect_to blob_url, allow_other_host: true
  end

  private

  def blob_url
    # We only want to change the URL to Cloudfront's domain if we are using Amazon S3.
    return cloudfront_url(@blob, disposition: params[:disposition]) if amazon?

    @blob.url(disposition: params[:disposition])
  end
end
Note that we’re including the Cloudfrontable concern. After that it’s pretty much standard stuff. Since Cloudfront only works with an S3 bucket, we first check if the service configured in ActiveStorage is S3 (we have named it amazon ).
The representations controller is almost identical:
# app/controllers/active_storage/representations/redirect_controller.rb
# frozen_string_literal: true

class ActiveStorage::Representations::RedirectController < ActiveStorage::Representations::BaseController
  include Cloudfrontable

  def show
    expires_in ActiveStorage.service_urls_expire_in
    redirect_to representation_url, allow_other_host: true
  end

  private

  def representation_url
    # We only want to change the URL to Cloudfront's domain if we are using Amazon S3.
    return cloudfront_url(@representation, disposition: params[:disposition]) if amazon?

    @representation.url(disposition: params[:disposition])
  end
end
We want to override both controllers since you might want to target your blobs directly or some representation of them (typically images).
Finishing Up
You can test this locally or on a higher environment fairly easily. Just fetch the URL of a blob (it really depends on how your API and project works) and check where it leads. You should get a URL that points to your API but redirects the user to Cloudfront.
You can quickly generate the URL that points to a blob by calling the Rails route helper:
Rails.application.routes.url_helpers.rails_blob_url(blob)
This should output a URL similar to:
https://YOUR_DOMAIN.com/rails/active_storage/representations/redirect/ eyJfcmFpbHMiOnsibWVzc2FnZSI6IkJBaHBBcDVUIiwiZXhwIjpudWxsLCJwdXIiOiJib G9iX2lkIn19--90ee7e940c77b194a9d55012d595f560d2085eb5/eyJfcmFpbHMiOnsib WVzc2FnZSI6IkJBaDdCem 9MWm05eWJXRjBTU0lJY0c1bkJqb0dSVlE2RkhKbGMybDZaVjkw YjE5c2FXMXBkRnNIYVFLUUFXa0NrQUU9 IiwiZXhwIjpudWxsLCJwdXIiOiJ2YXJpYXRpb24i fX0=--2640bc2d2290293bac7db1c3c43366e58f53ae97/image.png
If the signed ID of the blob is valid, then our redirect controller will return a Cloudfront URL! And that’s it. You can also add more logic to the controllers we overloaded to make sure the user is authenticated.
Caveats
As I said at the beginning of this post, there’s no such thing as a free lunch. Here are some caveats to be mindful of.
- Mirroring not possible/difficult: if your project is big and/or the information you store is vital you might want to store it in multiple providers (AWS, Google Cloud, Azure, etc). This Cloudfront setup does not play well with that approach, since you would be excluding all other providers from the benefits of the CDN.
- Provider Lock-in: similar to the previous point, but you can only enjoy the benefits of this approach when using Cloudfront and S3.
- Rails assets not included: this post covers only ActiveStorage blobs. If you want also to serve your rails assets via Cloudfront, then I recommend the first part of this post, which creates a separate distribution.
TL;DR
ℹ️ This section provides minimal information on how to configure S3, Cloudfront and ActiveStorage. Read the full post for details.
Want to speedrun this configuration? Here we go.
-
Create an S3 bucket.
- Make sure public access is blocked.
- Create credentials for a user. Recommended: limit its permissions only to use the bucket.
-
Create a Cloudfront distribution:
- The origin domain of the distribution must be the domain of the S3 bucket. You should be able to select it from the list AWS provides.
- Origin access must be set to "Origin access control settings". You'll need to create a new Origin Access Control (OAC), which should be very simple. Force it to sign the requests. You will need to update bucket policy later, AWS will help you out on this.
- Force the distribution to only accept HTTPS connections.
- Restrict the viewer access. By default AWS should prompt you to add key groups. You'll need to create a key group containing a key-pair. Create a key pair on you local machine and upload the public key to AWS and that’s it.
- Origin request policy must be set to
AllViewerExceptHostHeader. This forwards all query parameters to S3 allowing us more flexibility.
-
Configure ActiveStorage
- Create the
Cloudfrontablemodule. - Overload the
ActiveStorage::Blobs::RedirectControllerandActiveStorage::Representations::RedirectControllercontrollers. - Make sure ActiveStorage is configured in redirect mode.
- Make sure ActiveStorage has access to your private key (this depends on your infrastructure and deployment process).
- Create the
# app/controllers/concerns/cloudfrontable.rb
# frozen_string_literal: true

module Cloudfrontable
  extend ActiveSupport::Concern

  # Returns the Cloudfront URL for the given blob.
  def cloudfront_url(blob, options = {})
    uri = URI.parse("https://#{Rails.application.config.aws_cloudfront_domain}/#{blob.key}")
    query = [
      "response-content-type=#{URI.encode_www_form_component content_type(blob)}",
      "response-content-disposition=#{URI.encode_www_form_component(options[:disposition] || default_content_disposition(blob))}",
    ].compact.join('&')
    uri.query = query

    signer = Aws::CloudFront::UrlSigner.new(
      key_pair_id: Rails.application.config.aws_cloudfront_key_pair_id,
      private_key_path: Rails.application.config.aws_cloudfront_private_key_path,
    )

    signer.signed_url(
      uri.to_s,
      expires: Time.now.utc.to_i + ActiveStorage.service_urls_expire_in.to_i,
    )
  end

  private

  def default_content_disposition(blob)
    "inline; filename=\"#{filename(blob)}\"; filename*=UTF-8''#{filename(blob)}"
  end

  def amazon?
    Rails.application.config.active_storage.service == :amazon
  end
	# These two methods are needed in case you use variants. You'll need to make some changes
	# if you don't use variants with records.
  def content_type(blob)
    blob.is_a?(ActiveStorage::VariantWithRecord) ? blob.image.content_type : blob.content_type
  end

  def filename(blob)
    blob.is_a?(ActiveStorage::VariantWithRecord) ? blob.image.filename : blob.filename
  end
end
# app/controllers/active_storage/blobs/redirect_controller.rb
# frozen_string_literal: true

class ActiveStorage::Blobs::RedirectController < ActiveStorage::BaseController
  include ActiveStorage::SetBlob
  include Cloudfrontable

  def show
    expires_in ActiveStorage.service_urls_expire_in
    redirect_to blob_url, allow_other_host: true
  end

  private

  def blob_url
    # We only want to change the URL to Cloudfront's domain if we are using Amazon S3.
    return cloudfront_url(@blob, disposition: params[:disposition]) if amazon?

    @blob.url(disposition: params[:disposition])
  end
end
# app/controllers/active_storage/representations/redirect_controller.rb
# frozen_string_literal: true

class ActiveStorage::Representations::RedirectController < ActiveStorage::Representations::BaseController
  include Cloudfrontable

  def show
    expires_in ActiveStorage.service_urls_expire_in
    redirect_to representation_url, allow_other_host: true
  end

  private

  def representation_url
    # We only want to change the URL to Cloudfront's domain if we are using Amazon S3.
    return cloudfront_url(@representation, disposition: params[:disposition]) if amazon?

    @representation.url(disposition: params[:disposition])
  end
end
Conclusion
Before finishing, some closing thoughts. This solution is clearly not meant to be used by everybody in every use case. It’s more of an optimized solution for a few use cases. The posts I could find on the subject were not really what I was looking for, so I was looking to come up with something that might work for a specific use case, which means it might not necessarily work for yours. However, I do hope you find this helpful.
Thanks for reading, and if you have any comments, feel free to reach out. If you felt inspired by this blog check our previous work or contact us!